Latching
Push the remote button A, the relay connects, push the remote button B,
the relay dis-connect.
Time delay mode
Push the remote control button, the relay connects, from when release
the remote button, after 5s or 10s or 15s or 20s, the relay disconnect
automatically
Automatic energize when power
When power supply, the relay connects.
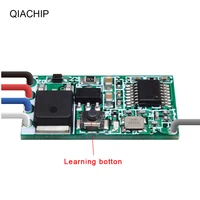
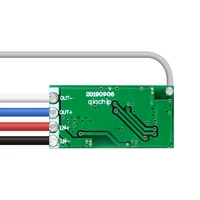
RECEIVER OPERATING MODE SETTINGS
How to Set Momentary Mode
Push the learning key on the receiver once time, it comes into momentary setting
mode.
Wait for a moment, the LED will be on, it comes into learning state. Push the
remote button,
LED indicator on the receiver board will flash 3 times and then come off,learning
successfully
How to Set Toggle Mode
Push the learning key on the receiver twice time, it comes into toggle setting mode
Wait for a moment, the LED will be on, it comes into learning state.Push the remote
button, LED indicator on the receiver board will flash 3 times and then come off,
learning successfully
How to Set Latching Mode
Note: When you choose for latching mode, in order to learn more remote control,
you need to learn two different button, the first time learning is for “ON”, the
second time learning for“OFF”.
For example : button A = ON , button B = OFF, Push the learning key on the
receiver triple time, it comes into latching mode. Wait for a moment, the LED
indicator on the receiver board will be on
Push the remote button A, LED flash for 3 times.
Push the remote button B. LED indicator flash for 3 times and then come
off, learning successfully.
How to Set Time delay Mode
Push the learning key on the receiver forth time, the time dealy for 5 seconds.
Push the learning key on the receiver fifth time, the time delay for 10seconds.
Push the learning key on the receiver sixth time, the time delay for 15seconds.
Push the learning key on the receiver seven time, the time delay for 20seconds.
The LED indicator will be off .Push the remote button, LED flashes and off,
learning successfully.
How to Set Automatic energize when power
The factory default setting is power off when powered on. Press and hold
the receiver’s learning button for more than 5 seconds until the indicator light
flashes, then the power-on setting is successfully configured (after successful
configuration, regardless of the state before power off, it will always be in the
powered-on state when powered on again).


Reviews
Clear filtersThere are no reviews yet.